Clients Report Overview
Last updated: November 20, 2026
The Clients Report gives you one place to see all of your client information, including active clients, clients on hold, and breakdowns by client type, sales rep, and rental location.
A Report View dropdown switches the table between 7 views. This report replaces 7 separate reports: Clients, Clients on Hold, Clients by Client Type, and Clients by Sales Rep from the Work Reports, plus Clients by City, Clients by County, and Clients by Zip Code from the Dumpster Reports.
Before You Start
Here are a few things to know before you continue:
By default, Admins and Office Staff have access to Reports. Admins can also choose to grant access to other roles.
If you don't see the Reports option in your menu, you may not have the necessary permissions. Reach out to your Admin for access.
If you are an Admin and would like to grant additional employees access to reports, please check out this article.
The 7 reports this report replaces are still available under Reports (Legacy). We recommend using the Clients Report going forward.
The Clients, Clients on Hold, Clients by Client Type, and Clients by Sales Rep views list your active clients as of today.
Key Features
The Clients Report brings these tools together in one place:
Summary: Shows your active clients, clients on hold, and new clients, plus the percentage of clients with no client type and with a sales rep.
Filtering Options: Filter results by timezone, date, client type, sales rep, and payment terms.
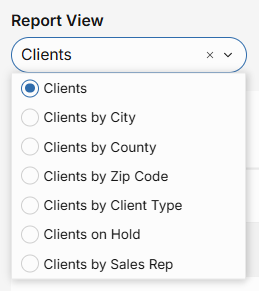
Report Views: Switch between 7 views: Clients, Clients by City, Clients by County, Clients by Zip Code, Clients by Client Type, Clients on Hold, and Clients by Sales Rep.
Run the Clients Report
The Clients Report lives in the Operations Reports section of your Reports page. To run the Clients Report, follow the instructions below:
Click into "Reports" in the left-hand menu under Administration.
Scroll down to find the Clients Report listed under Operations Reports.
Click on the "Open Inline" icon to run the report in Docket.
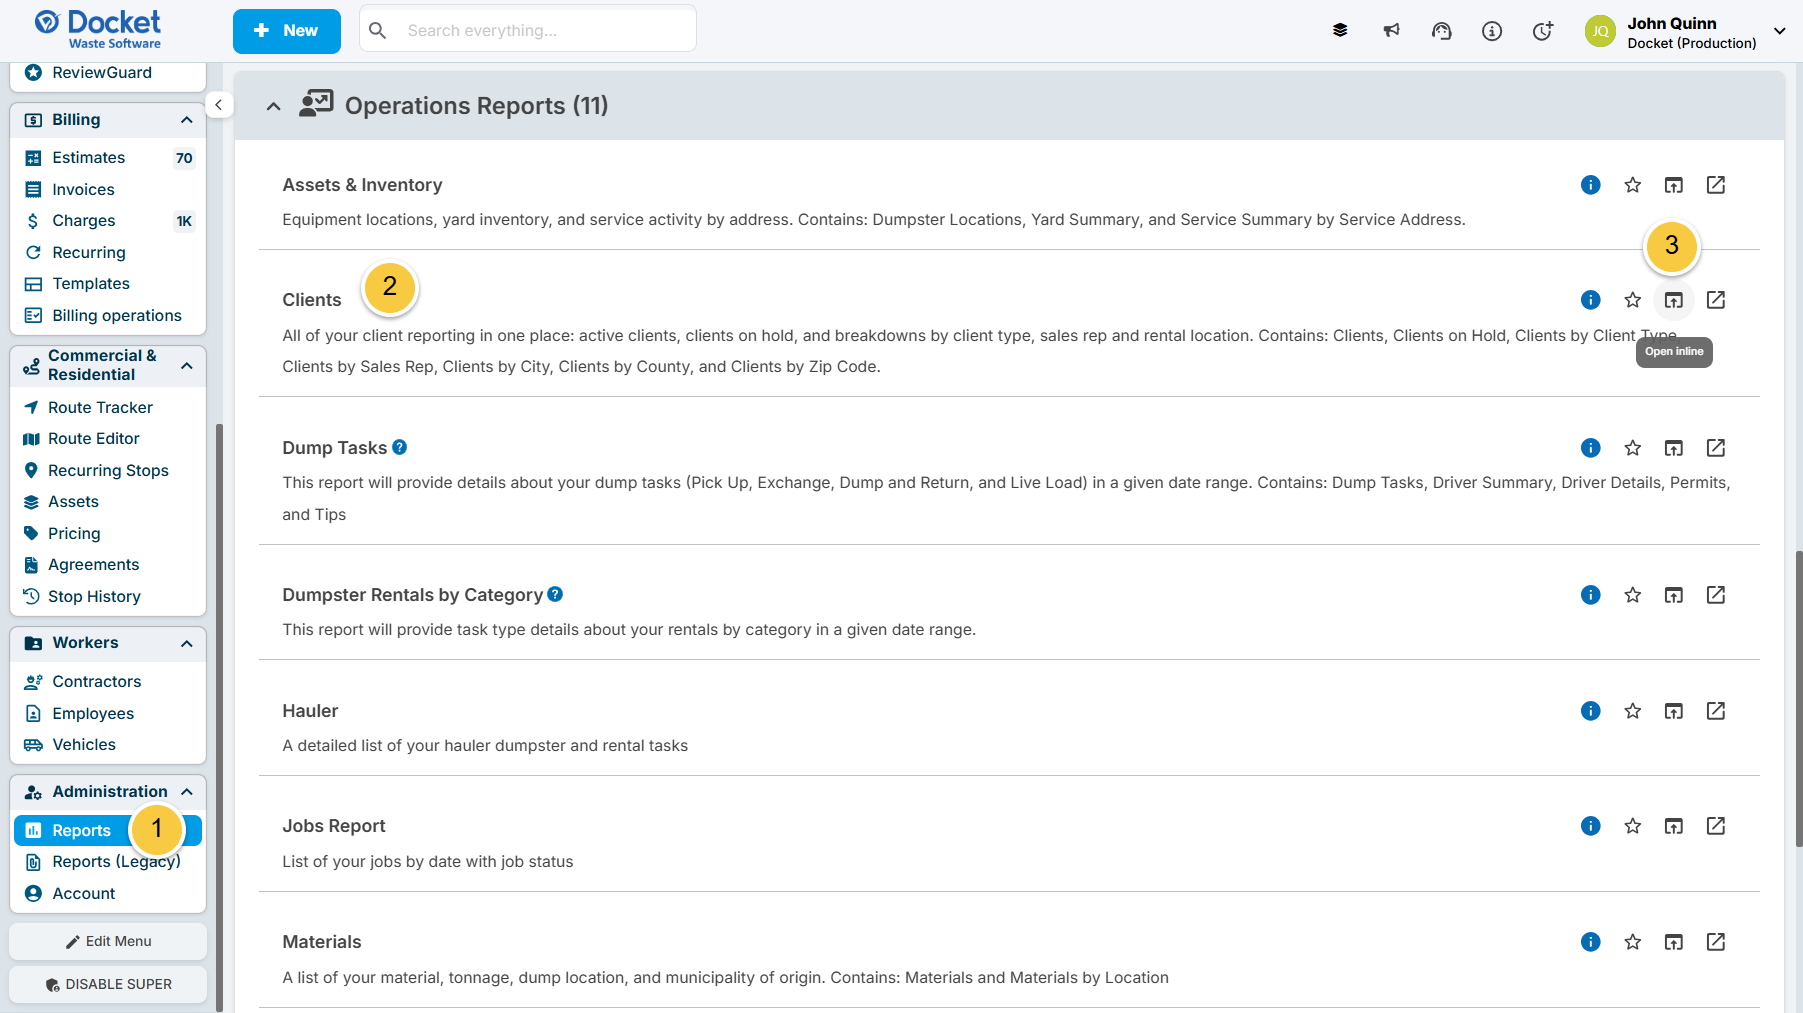
Please Note: For more information on other ways to run a report, please check out this article.
Review the Clients Report Summary
When the report loads, the tiles at the top give you a snapshot of your clients. These tiles stay the same no matter which Report View you have open below them.

The tiles are:
Active Clients: Total number of active clients in your account. This is the large tile on the right.
Clients on Hold: Number of clients currently on hold.
New Clients L30: Number of new clients added in the last 30 days. L30 stands for "last 30 days."
Unassigned Client Type: Percentage of clients with no client type assigned.
Clients with a Sales Rep: Percentage of clients with a sales rep assigned.
Filter the Clients Report
Use the filters at the top of the report to narrow your results.

Report View: Switch the table below the tiles between 7 views. Defaults to Clients.
Timezone: Controls how dates and times in the report display. Defaults to Eastern Time (US & Canada).
Date: Sets the date range for the Clients by City, Clients by County, and Clients by Zip Code views. Defaults to "This month."
In addition to the filters that appear at the top of the report, you can click “All Filters” to use additional filters for your report.
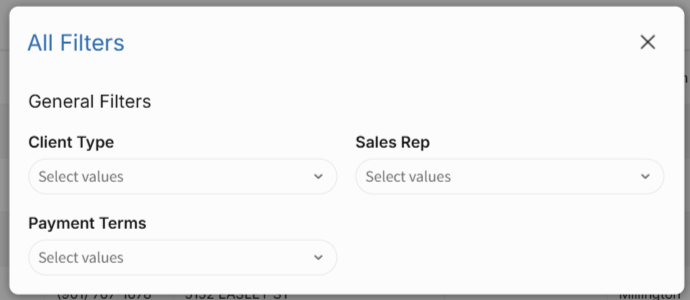
Additional filters include:
Client Type: Narrow results to one or more client types.
Sales Rep: Narrow results to one or more sales reps.
Payment Terms: Narrow results to one or more payment terms.
The report automatically updates after each filter option is selected or changed.
Review the Clients Report Views
Click into the "Report View" dropdown to switch the table below the tiles between 7 breakdowns of your client data.
Clients
This is the default view. It gives you one row per active client as of today, with no grouping. Scroll to the right to see every column. Columns include Company Name, First Name, Last Name, Email, Phone, Address Line 1, Address Line 2, City, State, Zip, County, Account Id, Tags, Is Tax Exempt, On Hold, On Hold Reason, and Created On.
The Tags column shows the tags on the client, along with details like client type and payment terms. Is Tax Exempt shows True or False, and On Hold shows Yes or No.
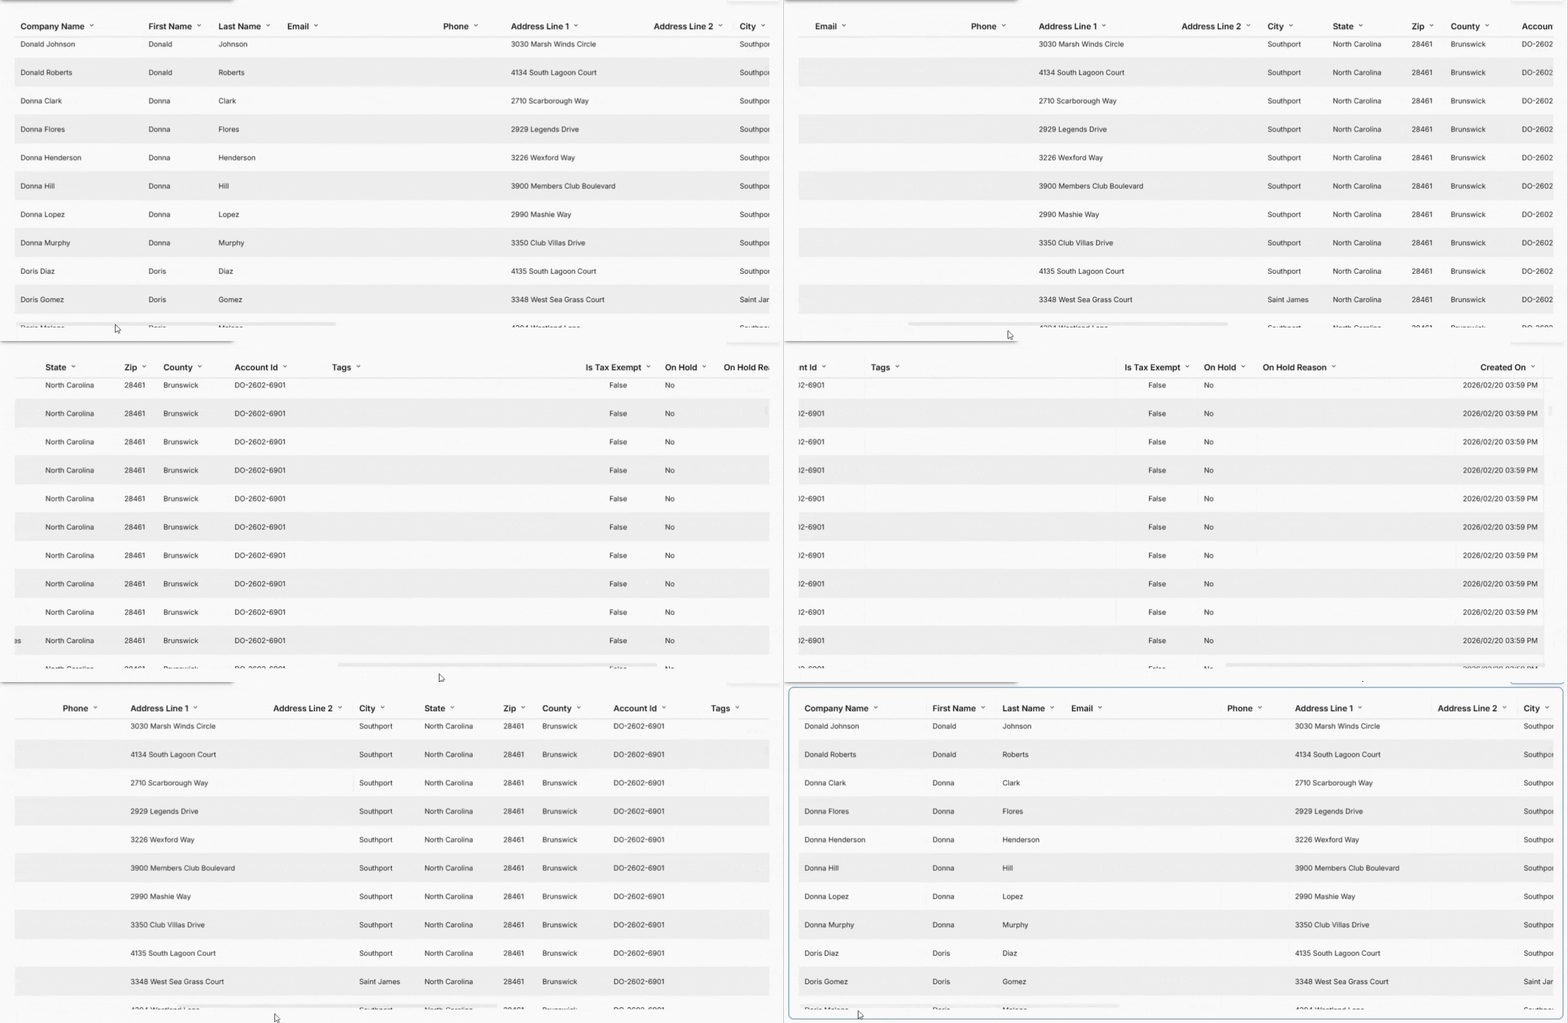
Please Note: Created On follows the Timezone filter. Set your Timezone before you read or export those dates and times.
Clients by City
This view lists one row per completed dumpster task from the date range you select, grouped by the task's city. Columns include City, Client, and Address.
A client with several tasks appears once for each task. Clients who are no longer active also appear if they had a completed task in the date range. If a task has no city, it shows as "Unassigned."
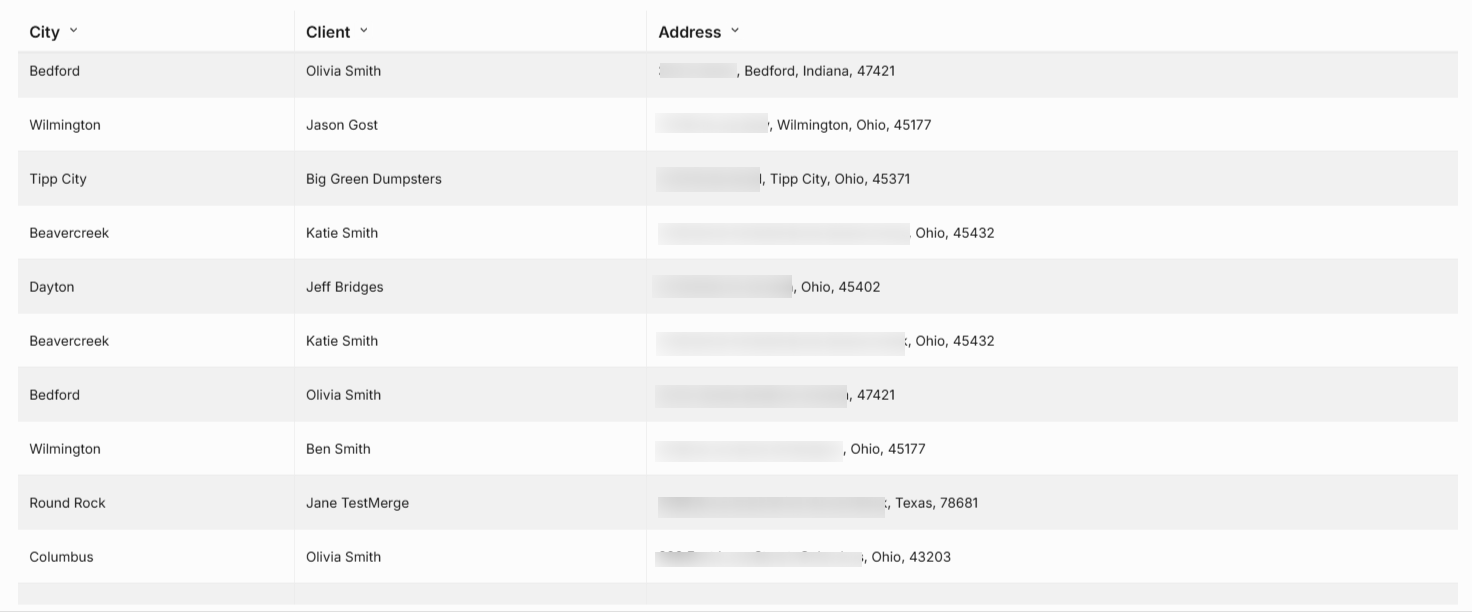
Please Note: The address in this view comes from the task, not from the client's profile.
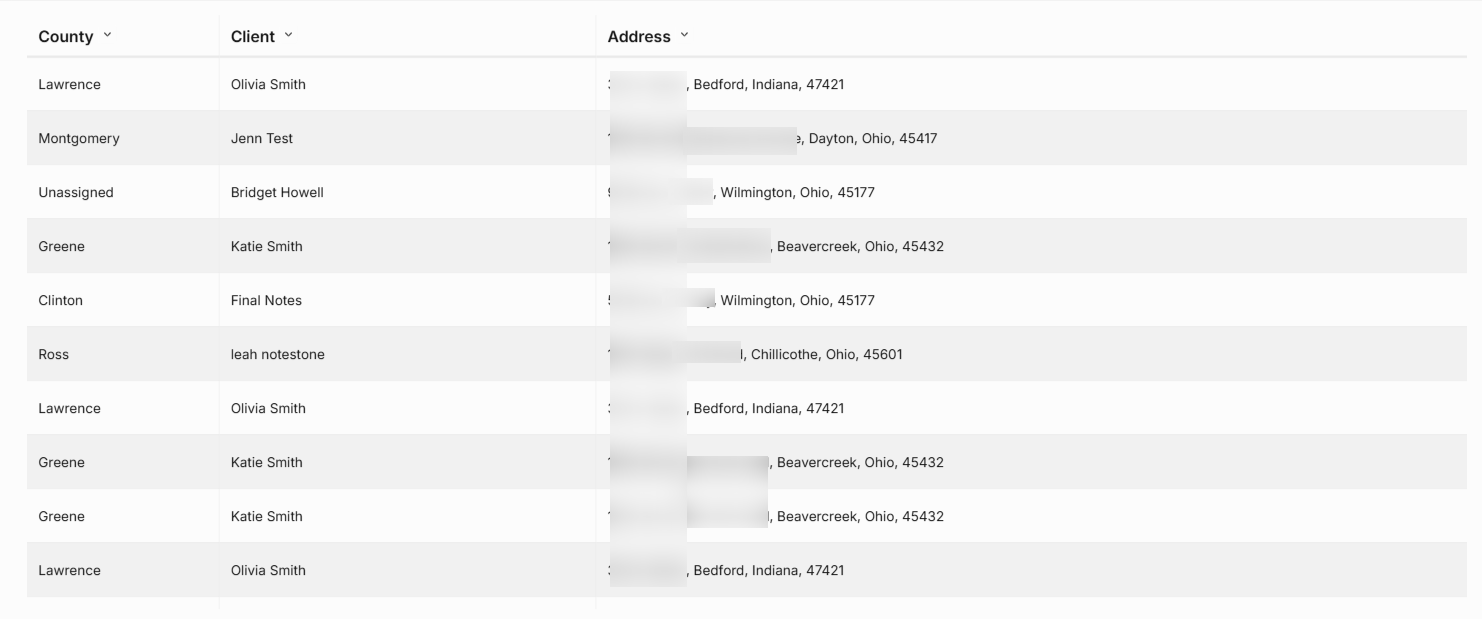
Clients by County
This view works like Clients by City, with the county from the task's address. Columns include County, Client, and Address. If a task has no county, it shows as "Unassigned."
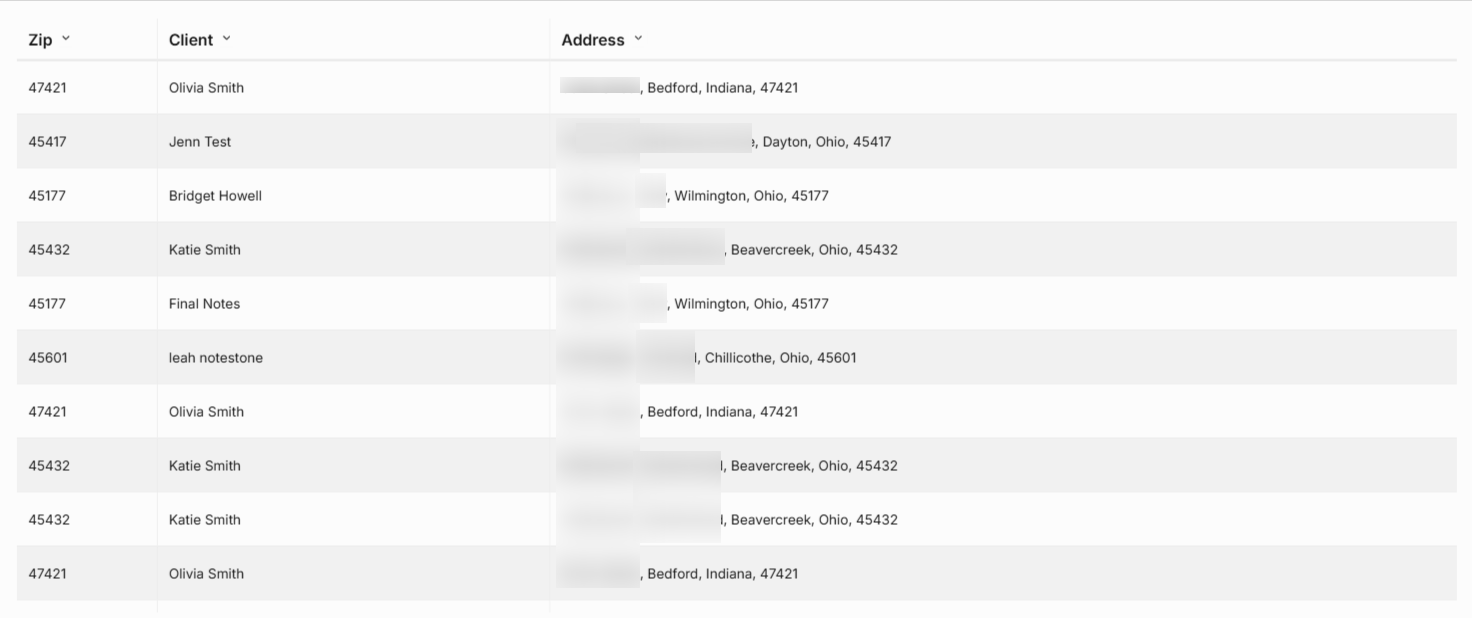
Clients by Zip Code
This view works like Clients by City, with the zip code from the task's address. Columns include Zip, Client, and Address. If a task has no zip code, it shows as "Unassigned."
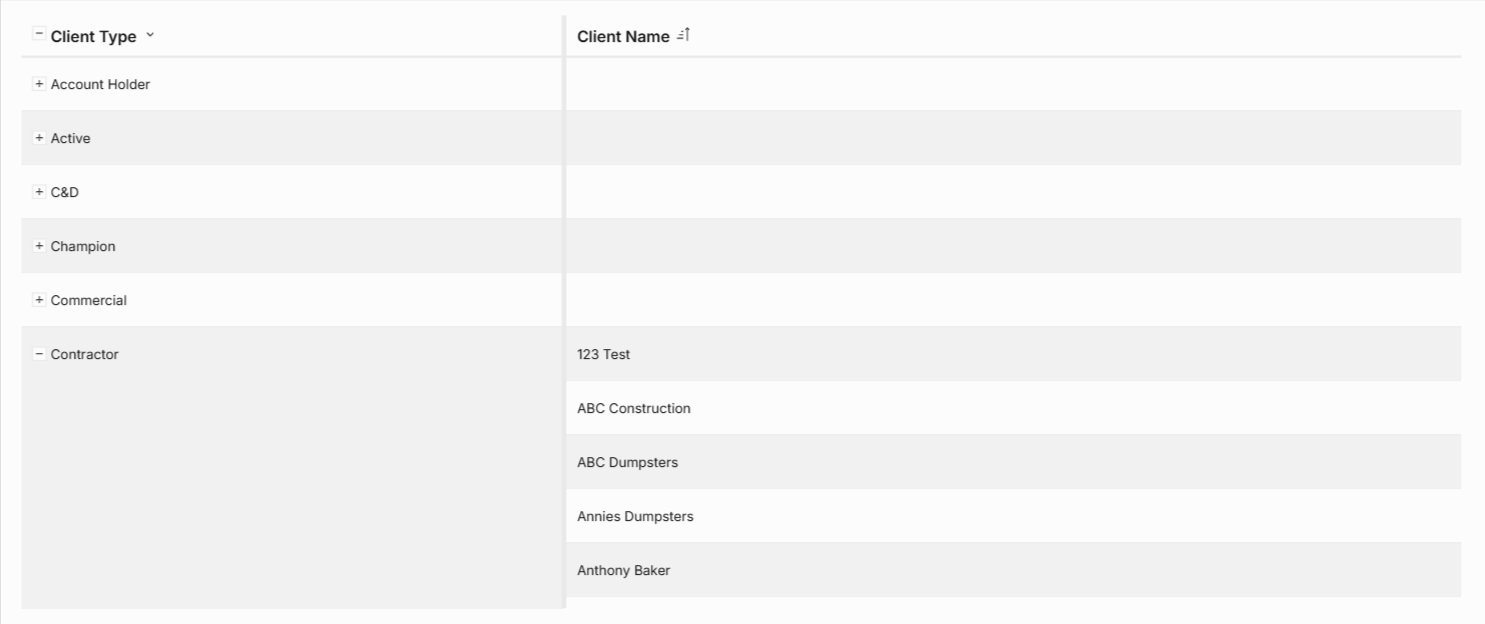
Clients by Client Type
This view groups your active clients by client type, so you can see who falls under each type. Columns include Client Type and Client Name. Clients with no client type appear under "Unassigned." This table loads with every Client Type expanded, but you can collapse them individually or all at once, to focus on the data you need.
Clients on Hold
This view shows only the clients who are currently on hold. It uses the same columns as the Clients view, so you can check On Hold Reason by scrolling to the right to see why each client is on hold.

Clients by Sales Rep
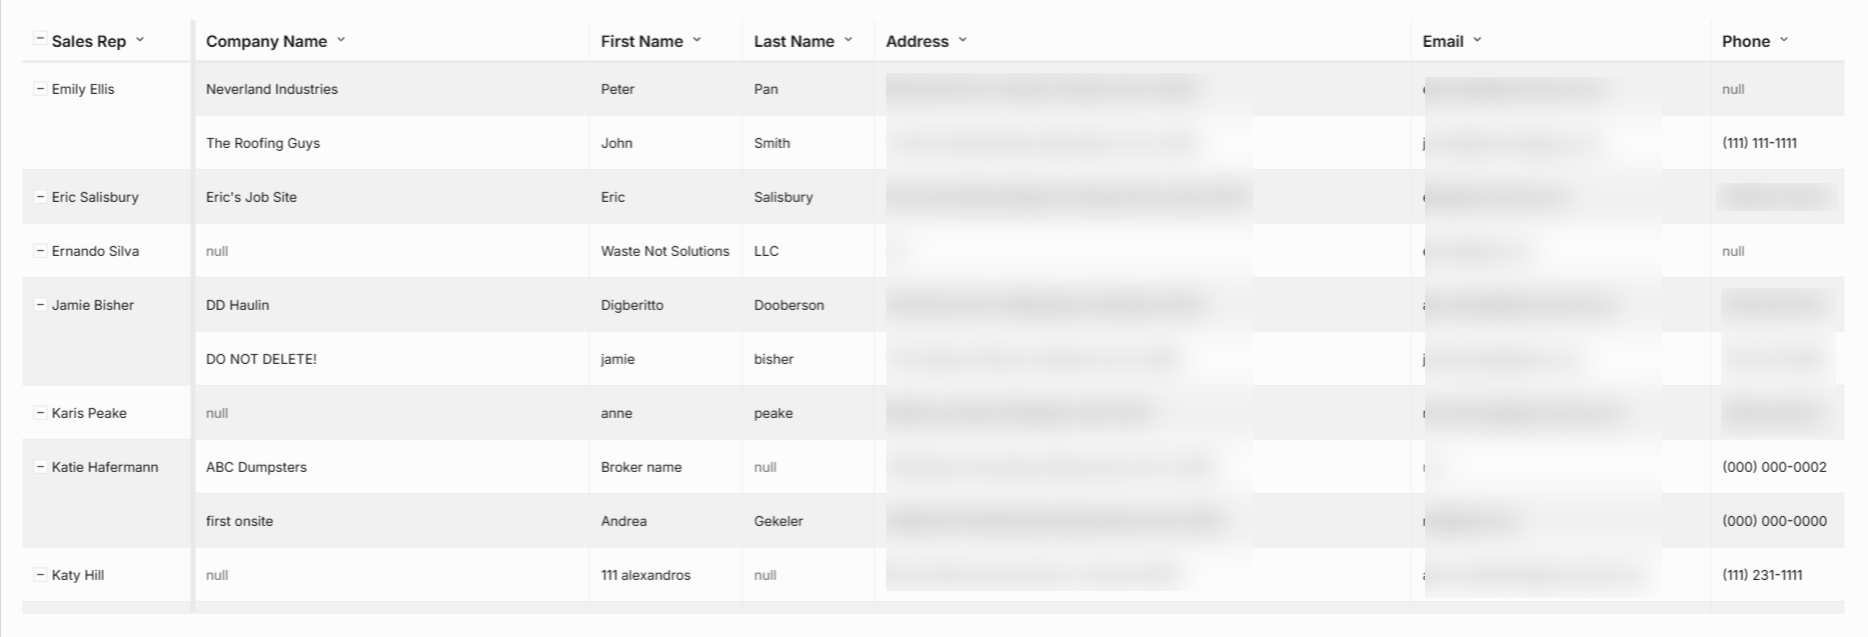
This view groups your active clients by sales rep. Columns include Sales Rep, Company Name, First Name, Last Name, Address, Email, and Phone. Clients with no sales rep appear under "Unassigned."
Please Note: The legacy city, county, zip code, and client type reports showed summary counts. This report lists the client detail, so you can export the table and summarize it in a spreadsheet.
Expand or Collapse Details in a Table
On the Clients by Client Type and Clients by Sales Rep views, rows load expanded so you can see every client right away. Click on the "-" icon next to a row to collapse it.
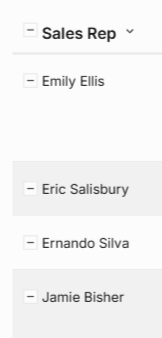
TIP: Click on the "+" or "-" icon in the column header to expand or collapse every row in the table at once, instead of doing it one row at a time.
Sort the Clients Report
After you set your filters, you can sort the data in the table. Sorting helps you find the clients you need faster.
To sort the data in a table using the column headers, follow the instructions below:
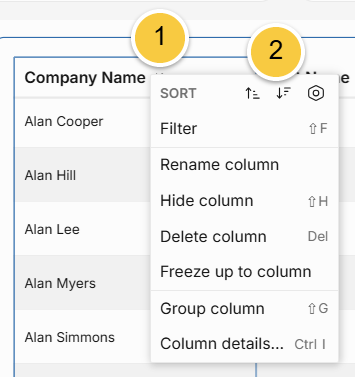
Click on the down arrow at the top of one of the table's column headers.
Select your sort preference or click on the gear icon for additional options.
Each column can be sorted either alphabetically A-Z or Z-A, or numerically ascending or descending.
Export or Send the Clients Report
You can download the table or email it to someone. This is helpful for sharing client lists or building your own summaries in a spreadsheet.
Export the Report
Once the table shows the information you want, you can download it for your records. To export the report, follow the instructions below:
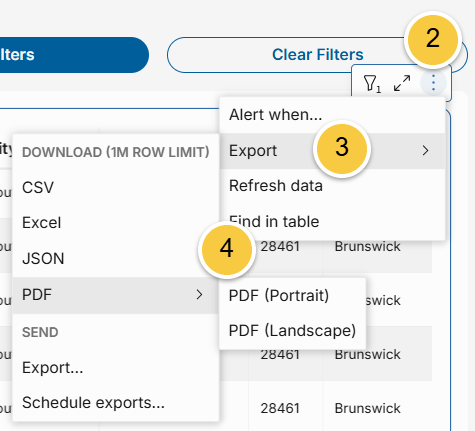
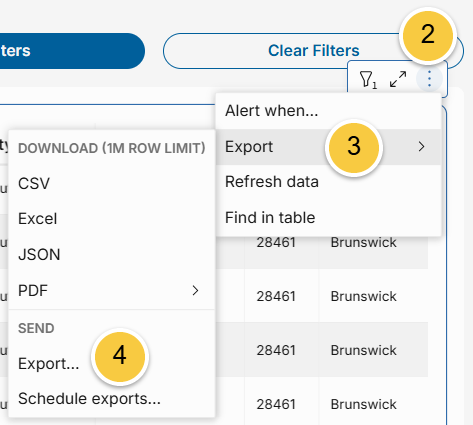
Hover over the table so a menu appears in the top right corner of the table.
Click on the three vertical dots.
In the menu that appears, hover over "Export."
Select your file preference in the list of options that appear. The report downloads in the file format you selected.
When exporting as a PDF, you can choose Portrait or Landscape layout.
Please Note: You can export up to 1 million rows at a time. If your table contains more than 1 million rows, we recommend using filters to break the data into smaller, exportable chunks.
Send the Report
You can also email the table straight from Docket. To send the report, follow the instructions below:
Hover over the table so a menu appears in the top right corner of the table.
Click on the three vertical dots.
In the menu that appears, hover over "Export."
Click on "Export..." at the bottom of the list under the Send section.
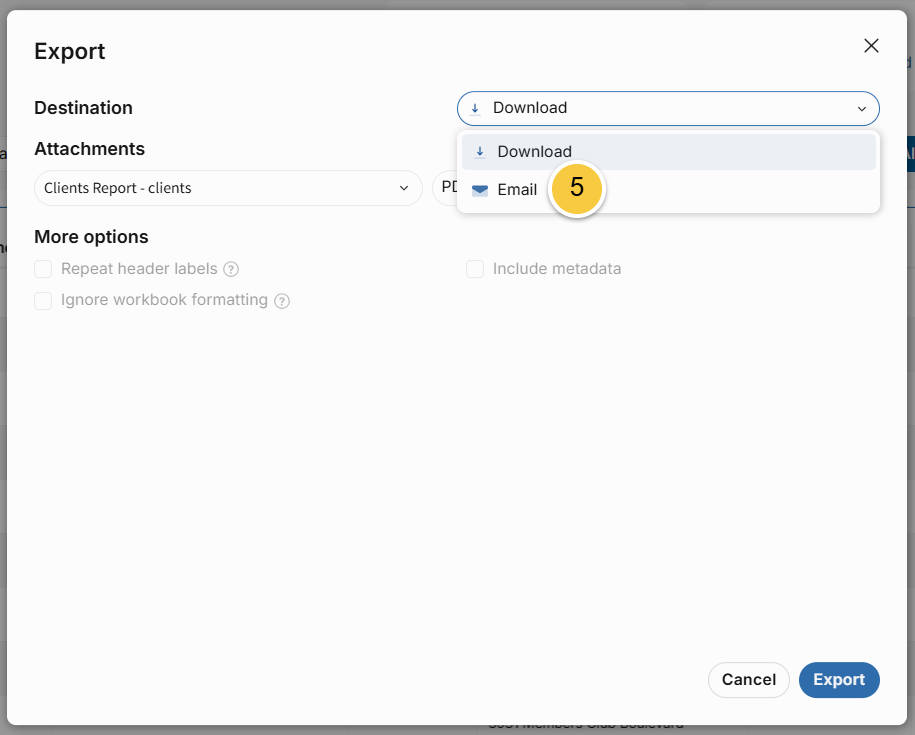
In the pop-up that appears, click into the Destination field and select "Email" in the drop-down menu.
Enter the email address of the recipient.
Click on "Export" to send an email with the report attached.
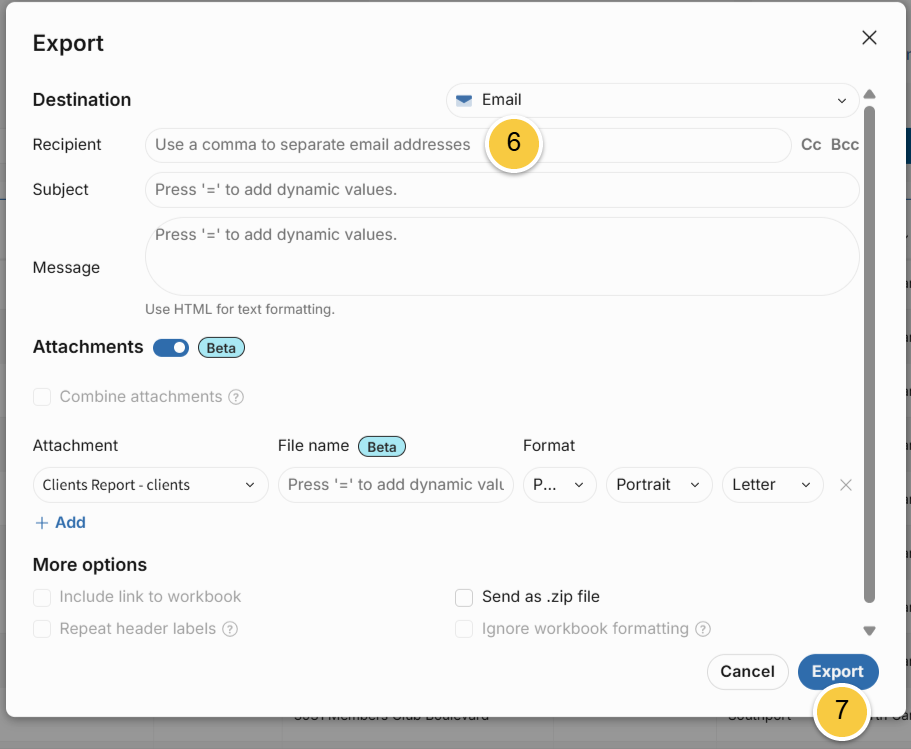
Please Note: On the final screen, you can also customize the email subject and message, select specific attachments and file types, or send the report as a .zip file.
If you have any questions, please reach out to our Support team through the chat widget on the bottom of this page or by sending an email to support@yourdocket.com!